Here’s a short video I did as I was working on a Fish Tales game about to be put on location. I go over a number of things I’m doing to make the game operate more reliably and some general tricks for reducing wear and tear on the game.
It puts the ball in play, but it also may need a little bit of TLC, especially if someone has been using the game for awhile without the proper shooter rod rubber tip. Here is a quick video on how to fix the rod and make it like new.
In this video I show how you can replace a broken linkage in a flipper or slingshot or other plunger assembly. These are notorious for breaking. You can purchase the entire assembly with a link, or you can punch out the roll pin and install your own link. Is it worth it to DIY this? I’ll let you decide.
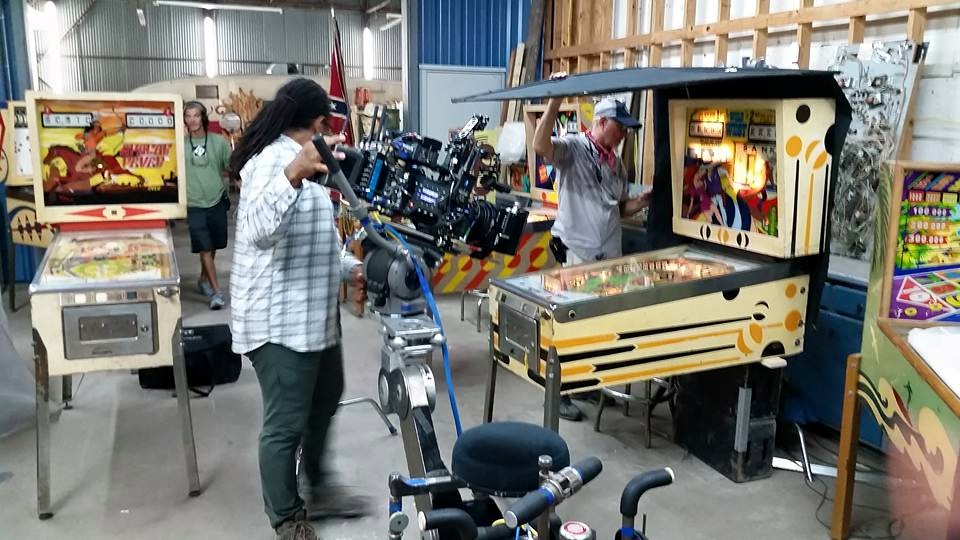
Yesterday was a very long and interesting day.. I have been occasionally renting pinball machines for various movie productions – there’s a lot of stuff coming out in the next year or two my games will have cameos in and that’s pretty cool. But yesterday I was actually tasked to help support the crew in managing a large array of games for a specific scene, not just involving games, but someone smashing a pinball machine.. yes not something I thought I’d ever intentionally be involved in, but this was written into the script and with or without me, they were going to do it, so if there was a way I could make this process as non-destructive as possible, I was determined to find a way…
I ended up not simply making sure the games were ok, but advising the production team on continuity issues, and helping them address plot lines and scenes that made sense given the setting – it was a ton of fun, without a whole lot of breaks. I was actually consulting with the directors on what certain characters should do in the scene. I also played the machine for the “inside shots” of the pinball activity, so when they show close-ups of gameplay, that’s me playing while the wide shots will show the actors. I guess I was a “pinball stunt double”.. lol Hey can I get a SAG card? 😉
Boy do I have a ton of respect for these movie production teams. They are really hard working, incredibly-well-coordinated people. They created a 1970s-era carnival/amusement park. The set decoration was crazy.. it was called “Dixieville Amusement Park” — and talk about bizarre timing.. the place was decked out with Confederate flags everywhere, along with a giant gorilla near the road and a big billboard that had a rebel flag on it. They caught a lot of flack from the locals and ended up having to post police near the road and put up a big sign that said “Movie Set”.
Anyway, It was a lot of hard work getting everything set up, and then having this scene where a pinball machine was to be smashed. I worked it out so that one of mour members sold his Gottlieb Big Shot (which was really in pretty poor condition and just barely worked) to the production company. Obviously none of us were happy about giving them a machine slated to be destroyed in the filming, but I negotiated a deal where they give the game back and we can restore it so we can claim that nothing was actually destroyed. All I can say is.. wow that was stressful…
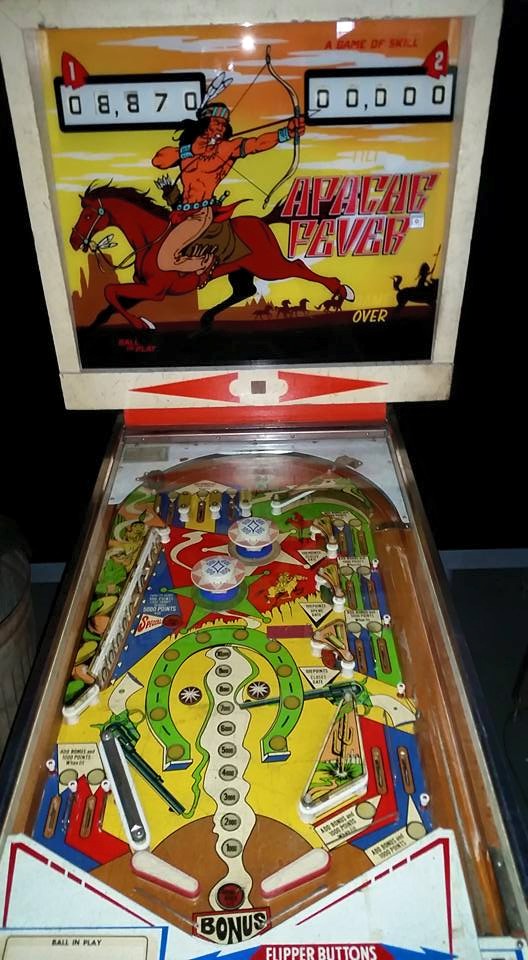
In order to avoid IP conflicts, they made phony backglasses for some of the machines. Luckily we had several machines with the same configuration so they made these 70s-esque vinyl on plexi backglasses that looked pretty cool. They covered the “Gottlieb” names with a bogus amusement company and they even color-matched the playfield paint to cover any human characters that might show up in filming.
During dress rehearsal, before they even started filming, the actor picked up the front of the machine and dropped it two feet to the cement floor. I just about had a heart attack thinking the game would be ruined during rehearsal!
So after every scene I had to jump in like an EMT to assess the patient’s condition.. lol.
Then they started doing the actual scenes – they had six pieces of specially-cut plate glass to put in the machine to do the filming. They shot 3 scenes from one angle, the game held up amazingly well. The first scene he picks up the game, drops it down, the glass doesn’t break, then he grabs an old ashtray and smashes it into the glass. Take two, same deal, except a different ashtray because the first one was destroyed. This time he hit the lockdown bar, the glass doesn’t break and the ashtray cuts his hand and he’s bleeding. In between every take there’s a team of people who come in and remove the glass, vacuum the playfield and reset everything, while I’m tinkering with the insides of the game trying to get it to start up again.
The production company replaces the recognizeable backglass with something original to avoid any IP claims.
After every take, something went wrong with the game, but I was able to keep stuff held together, game wouldn’t start, bonus kept counting down forever, one scene he tilted the game and the playfield lights went out and he kept pretending to play- I advised the crew that was a bad take- pinball people would immediately laugh at the actor pretending to play the game after it tilted.. lol – I disabled the tilt, score reels wouldn’t reset, the chimes broke off and were bouncing around in the cabinet, there was so much glass everywhere, little pieces of cabinet were everywhere… I honestly don’t know how this thing held up. It was mind-boggling how much abuse the game was taking and I was having little mini-heart-attacks after every scene.
Then they switched camera angles and re-did the scene from the opposite end. A one camera shoot of a two-camera scene because they couldn’t do them both together without the cameras being in each other’s scene.
And I was like, “Wait.. what? You have to re-create the same smashing sequence from a different angle now that has to match up with the first one? Good grief!” But these guys apparently do this all the time — I just wondered if they were used to the unpredictability of pinball?
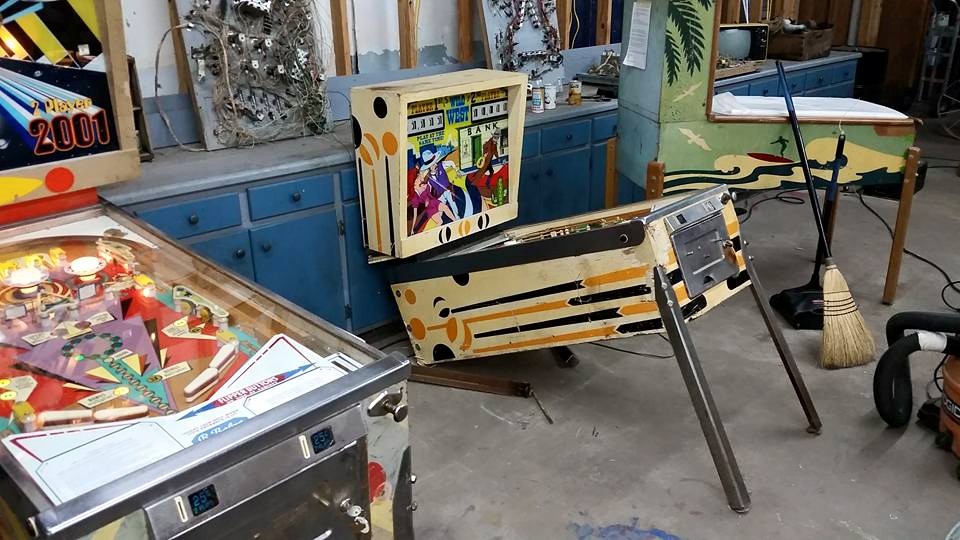
So on the second run, the actor picks up the machine — and I’m watching it on the monitor, and the machine disappears and we hear a large crash. I run in the room and he’s literally ripped the back legs off the game, so it falls apart and the glass break is completely different. Oh no!
The grip team comes in and starts going, “what are we going to do now?” So I get the pinball dolly and we hoist the machine up and they start pulling out their cordless drivers and screwing some 2x4s into the back of the machine and re-attaching the back and the legs… I look over and they’re using deck/drywall screws where the 5/8″ bolts were to hold the legs on… about that time the director comes over and asks me, “So this will hold up for the next scene?” And I freeze like a deer in the headlights… knowing, there’s no way this is going to hold up, but I don’t want to be the person to tell the director what he doesn’t want to hear.. lol So I just give him a kinda, “mmmm I dunno what do you think?” kinda look.
Meanwhile we’re having discussions on how to properly break the glass. When the ashtray doesn’t work, they decide to go with a hammer, and I’m like, “Um, they’re not going to be working on pinball machines with a hammer.. not a good thing to use…” so I suggest we take a lockdown bar from another machine, plus it looks heavy duty and I show the actor how to pick it up and how to smash the glass so he doesn’t cut himself. We do a few scenes with the lockdown bar as the “weapon” and it looks.. BAD ASS… He picks up the machine… drops it, smash, the legs go out, the camera is behind his shoulder — it’s a very dark, film noir-type shot, and you can see the two henchmen around this silhouette of him holding the lockdown bar like he’s going to beat them with it, and then he smashes the game glass so hard it pulverizes like it was tempered. Every scene becomes more and more intense, and for a moment I even forget it’s a film. Now I can’t say anything to the actor because I actually think he’s going to kick my ass he was so serious in the scene.. lol
tape that is painted to match the background is used to cover up recognizable areas of the playfield
Unfortunately, now they’ve used 5 of the 6 pieces of glass, and all the shots in the second scene have the machines legs collapsing.. so the two scenes don’t match. Now they decide to re-shoot the first scene and they get one take… and now we HAVE to make the legs collapse. Talk about pressure. So We’re putting this game together and after every shoot I’m like, “I cannot believe this game is still working!” I get them to loosen the leg screws, we advise the actor to bear down a little harder on the game because this is the last take and it has to collapse and he’s like, “Oh don’t worry! It’s going to collapse!”
They shoot the last scene, down to the wire, no second chances, and he nails it. The director is overjoyed. Everyone breaks, and I can fucking breath again….
Then I’m told, “Ok, now send the second camera crew in to get some inside shots of game play”….
Shots of gameplay? Of what?
You are now wanting shots of gameplay of the game you just destroyed nine times?
Are you freakin’ kidding me?
“Six minutes until lunch”.. They’re vacuuming the cabinet out and removing glass – it’s smashed on the ground.. they break for lunch and I’m looking at this broken game realizing it has to be back operational, and playable, in 45 minutes…
Yowie… That was an experience. But I ended up getting the game operational and we did a bunch of different shots with 4 different lenses of various parts of game play. Every time the ball drained, there was a good chance the game wouldn’t start again, but we managed to get the shots… In the end I was throwing the ball around with my hand at various targets to get certain shots they wanted to cut in to the main sequence.
I have a newfound respect for Gottlieb EMs. They take a licking and keep on ticking!
Depending upon who you ask, you may get different arguments for or against switching out your old incandescent pinball bulbs for newer LEDs. I don’t think this is an either-or proposition. I think you can do both! In this video series, I go into why you might want to update your lighting system and why, as well as talk about proper sue of lights based on their color temperature.
On many games such as this Theater of Magic, there are stand-up targets in the middle of the playfield that take a constant beating from the ball. The switch blades in these targets, as well as the entire assembly will often get bent out of position and stop registering. I demonstrate how to use a simple tool to fix the leaf switch blades and put them back into position, as well as some other techniques for making sure the targets are solidly-attached to the playfield.
Stand-up targets have changed very little over the decades so this technique works on both old and new pinball machines.
If you have a wobbly-feeling pinball flipper, there’s a good chance the bushing is either worn or broken. In this two-part video I go over how to remove the flipper assembly and replace the bushings so you can get nice, snappy, flipper action.
This general technique applies to most flipper assemblies with only a few minor detail changes. Some bushings were screwed into the flipper assembly (especially with Gottliebs) and others were connect to the flipper assembly plates themselves (as in later WPC games).