Bally Theater of Magic: Fixing a broken trunk and bulletproofing

I’m finally getting around to fixing my Bally Theater of Magic pinball. In this case, as is typical, the trunk stopped working. The trunk is not working at all, so let’s find out what’s wrong and I’ll also go into replacing the trunk opto board with a new and improved, German-made board. Will this fix all the problems? Watch and see….

Part 2: Work continues on the Bally Theater of Magic pinball – in this case, we’ve figured out why the trucnk wasn’t working even after installing a brand new, improved, aftermarket trunk board. The motor driver controller was shot! Now, while we’re bulletproofing the game, this is a good time to install the special Cliffy Protectors around the trunk to make sure there’s no damage to the plafield. In this video I go over how to lift the trunk out to be able to do this, among other things.

We finally got everything working on the Theater of Magic pinball – here’s a summary of everything that’s been done, along with an odd problem I had with an aftermarket proximity sensor.

Pinball Flipper Tune-Up: replacing bushings

If you have a wobbly-feeling pinball flipper, there’s a good chance the bushing is either worn or broken. In this two-part video I go over how to remove the flipper assembly and replace the bushings so you can get nice, snappy, flipper action.

This general technique applies to most flipper assemblies with only a few minor detail changes. Some bushings were screwed into the flipper assembly (especially with Gottliebs) and others were connect to the flipper assembly plates themselves (as in later WPC games).

Repair, don’t replace that broken pinball coil!

Pinball coils (aka solenoids) are windings of insulated copper wire that create electromagnets that make things move on the playfield. If you have a coil that is no longer working, and doesn’t have any obvious signs it has “melted down”, there’s a very good chance you can repair it instead of replacing it. In this video I go over how this is typically done. This works on all types of pinball machines from the EMs to Stern, Bally, Williams, etc.

Diagnosing, repairing and replacing pinball coin door service buttons

In this short video, I go over how to test the coin door service switches, and if faulty, how to replace them.

This is a fairly simple procedure.

If you have a button in the coin door that doesn’t appear to work, the first thing you should do is check to see if any of the wires have broken off or there’s a bad solder joint. This is very common because the coin door is opened and closed quite a lot and things can get snagged on the wires. Always check the wiring to make sure there are no kinks or damage to the wire. In the video I use a multimeter set to continuity to test the integrity of the switches. If the switches seem to work and the wiring is intact, the next thing to check is the continuity between the switches and the connector on the MPU board. If all that checks out, it could be one of the chips on the MPU board that handles the cabinet switches.

Did you really clean that board well enough?

The other day I was reminded of how important it is to make sure you fully mitigate battery acid leakage on circuit boards.  A friend picked up a STTNG (Star Trek the Next Generation) pinball machine.  I’ve been systematically going over the game trying to get it working.  When I first looked at the backbox I noticed wires had been run for a remote battery pack – I thought “good deal, one less thing I have to worry about.. the MPU board is clean…” so I went about working on other areas of the game, checking switches and optos and everything.  After I got the game booting up I discovered the start button would not work.  After spending a bunch of time testing all the wires and connectors and still not finding the culprit I took a closer look at the MPU board where the cabinet switches plug in…

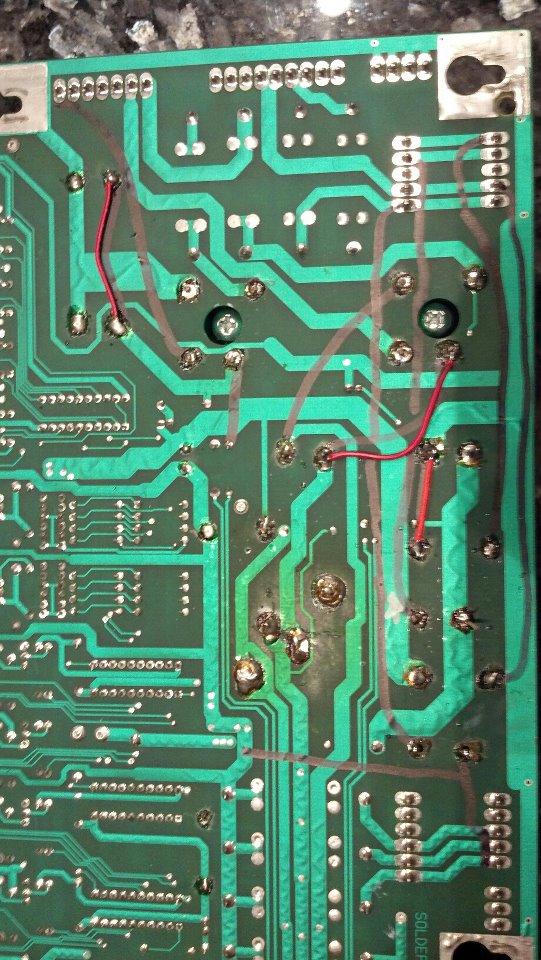
I have seen acid damage before, but nothing as sneaky and widely-spread as this. Components all across the main processing board were showing signs of corrosion and damage, but I could also see that repairs had been done, several components and ICs had been replaced and sockets added. Someone cleaned up battery damage and added an external battery pack. But there was still major corrosion on the board… what gives??

My theory is that whoever cleaned the circuit board, instead of using vinegar and multiple paper towels or q-tips, they probably used a single wipe, and in the process of cleaning the circuit board, actually spread the acid all over the components! At the time, they thought it was clean, but they actually made the problem worse.

This is why it’s very important to thoroughly clean off any leaked electrolyte from batteries, and use vinegar to neutralize it, and use multiple wipes — do not wipe from one area to another area. Work on small parts of the board at a time, throw the q-tip or paper towel away and use a clean one when you start to work on another area of the board. Do not risk spreading the acid to previously un-damaged components.